

Elevating Your Greenery: The Ultimate Guide to Building a Custom DIY Wooden Plant Stand
In the world of interior design, the humble houseplant has transitioned from a mere decorative accessory to a central pillar of home aesthetics. However, finding the perfect way to display these botanical companions—one that balances structural integrity, style, and budget—often presents a challenge. Enter the DIY wooden plant stand: a masterclass in functional minimalism that allows homeowners to elevate their greenery while exercising their woodworking skills.
This comprehensive guide explores the construction of a custom, beginner-friendly plant stand that utilizes readily available 2×4 pine boards. By integrating professional-grade joinery techniques with bespoke decorative touches, this project transforms raw lumber into a high-end furniture piece that looks far more expensive than its modest material cost suggests.
Main Facts: The Intersection of Utility and Design
At its core, this project is a lesson in the efficacy of simple, high-quality materials. By utilizing 2×4 pine—a staple of the construction industry—the builder gains access to a robust, forgiving, and inexpensive medium. The design objective is twofold: to provide a stable, load-bearing platform for indoor or outdoor planters, and to offer a customizable silhouette that complements diverse decor styles, from rustic farmhouse to modern industrial.

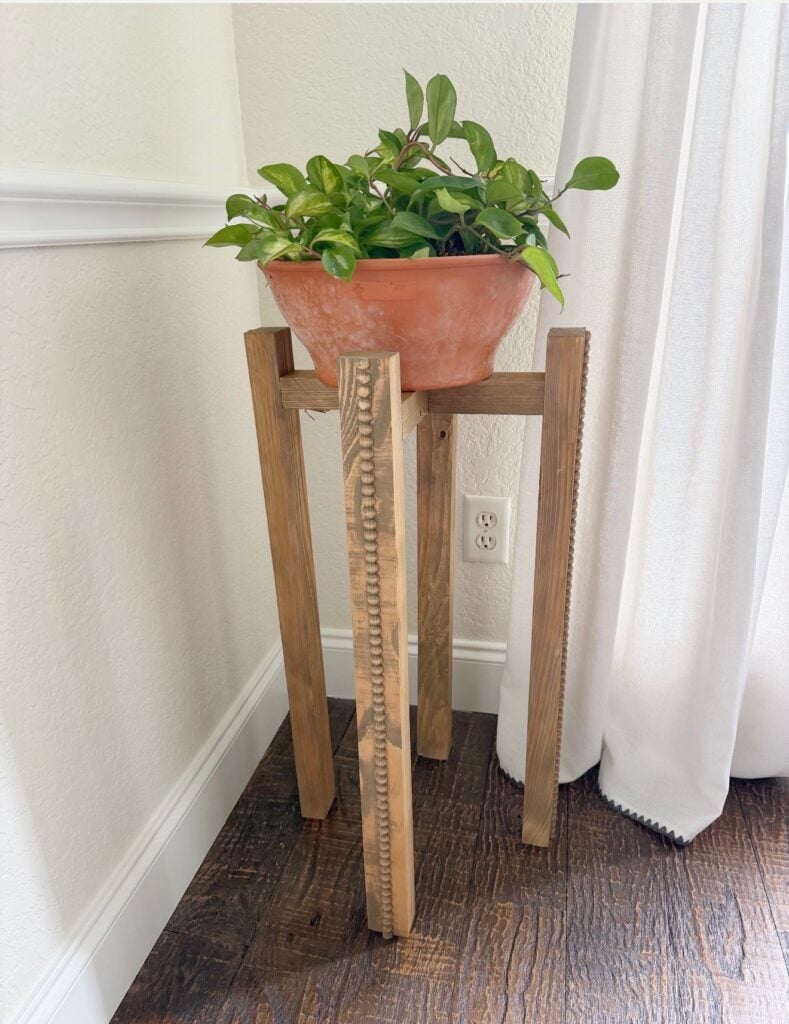
The standout feature of this specific design is the incorporation of decorative beaded trim. While the base structure relies on the mechanical strength of pocket hole joinery, the trim provides a tactile, refined detail that obscures the utilitarian nature of the pine boards, resulting in a finish that rivals boutique retail furniture.
The Evolution of the Build: A Project Chronology
Building a piece of furniture can feel intimidating for the novice, but breaking the process down into logical, chronological phases demystifies the workflow.
Phase 1: Precision Preparation
The success of any woodworking project is anchored in the quality of the initial cuts. Following the cut list is critical; even minor deviations can compromise the squareness of the final assembly. Once the 2×4 components are cut to their specified lengths, the focus shifts to surface preparation. A light sanding is not merely for aesthetics—it removes splinters and factory stamps, ensuring a professional, uniform surface ready for staining or painting.
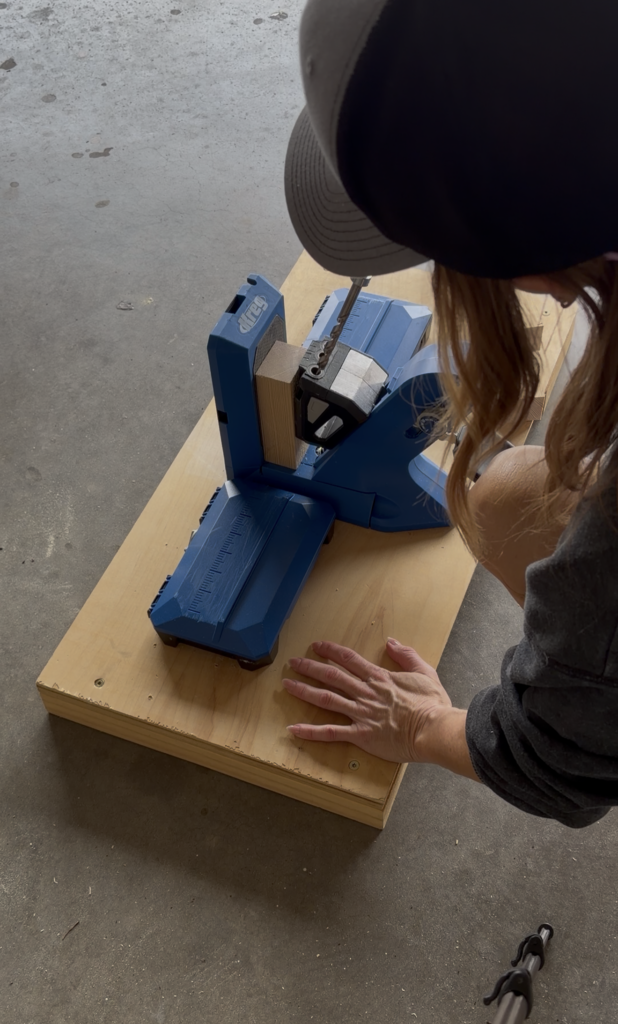
Phase 2: Structural Engineering with Pocket Holes
The modern DIYer’s secret weapon is the Kreg Jig. For this build, we utilize the 720PRO model, which exemplifies the evolution of pocket hole technology. By setting the jig for 1-1/2" material, we create precise, angled pilot holes in the center support and cross-pieces. This joinery method is favored for its speed and, more importantly, its hidden nature; because the screws are driven from the inside, the exterior of the stand remains clean and fastener-free.
Phase 3: Assembly and Alignment
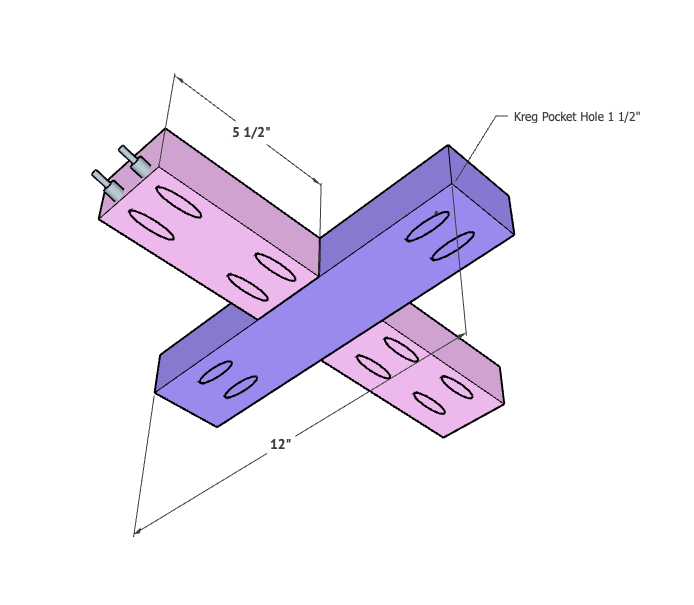
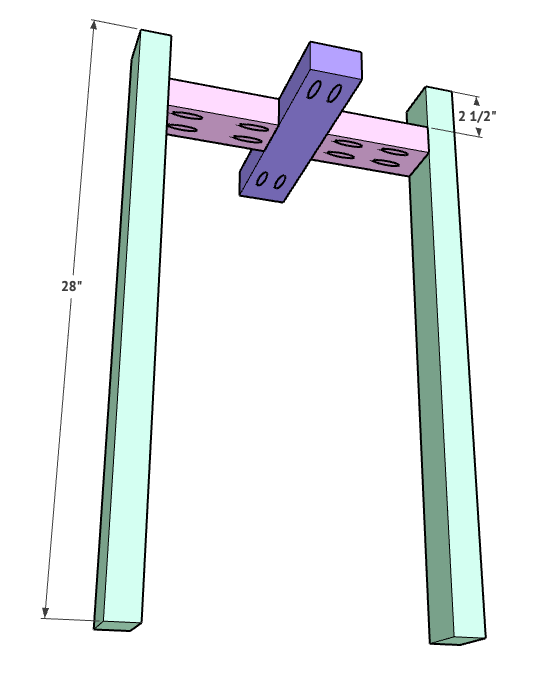
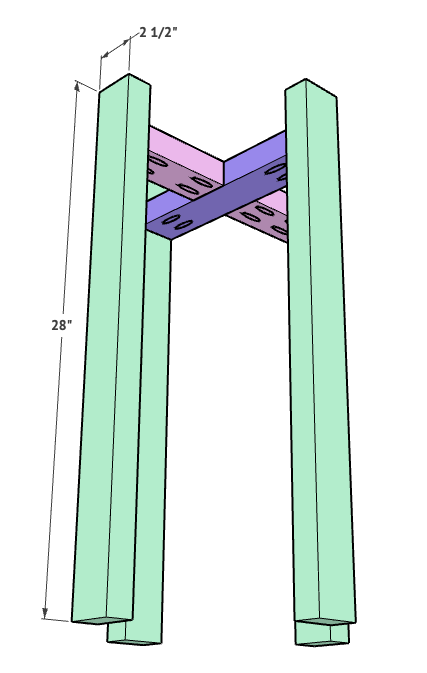
With the components prepared, the assembly phase begins with the center support. By attaching the 5-1/2" support pieces to the 12" center piece, we create an "X" or cross-member configuration. This assembly acts as the heart of the stand. Once the central core is secure, the four 28" legs are positioned. Measuring and marking these leg placements is the most vital step; a variance of even an eighth of an inch can cause the stand to wobble. By using a square and wood glue in conjunction with 2-1/2" pocket hole screws, we ensure the structural integrity of the frame.
Phase 4: The Finishing Touch
The final construction phase involves the application of decorative beaded trim. This is where the project shifts from a functional rack to a piece of decor. By applying a bead of wood glue and using a pin nailer to secure the trim to the center of each leg, the builder adds a layer of depth and visual texture. This is followed by a final, thorough sanding and the application of a protective finish—whether a deep walnut stain or a crisp, matte paint—to shield the pine from humidity and UV exposure.
Supporting Data: Why Tools Matter
A common misconception in DIY woodworking is that high-end results require high-end workshops. In reality, the quality of a build is often determined by the precision of the tools used. The Kreg Jig 720PRO is highlighted here not merely as a tool, but as a system for success.
Key Performance Metrics of the 720PRO:
- One-Motion Clamping: Reduces setup time by 40%, allowing the user to secure boards without repetitive manual adjustments.
- Integrated Stability: The inclusion of storage wings supports long, heavy boards, preventing sagging during the drilling process—a common cause of inaccurate holes.
- Thickness Adaptability: The automatic adjustment features ensure that the pocket holes are perfectly centered, regardless of minor variations in board thickness.
For the beginner, these features eliminate the "guesswork" that often leads to abandoned projects. By stabilizing the board and guiding the drill bit with surgical precision, the tool acts as a surrogate for decades of experience.
Official Perspectives: The Philosophy of "Shanty-to-Chic"
The design ethos behind this project is rooted in the "Shanty-to-Chic" movement—a design philosophy that advocates for high-style home environments built on low-budget, DIY foundations.
"We believe that everyone deserves a home that reflects their personality, regardless of their budget," says the project team. "By repurposing basic construction lumber into elevated furniture, we are not just building a stand; we are democratizing design."
According to the developers of these plans, the choice of pine is intentional. While hardwoods like oak or walnut are prized for their grain, they are often cost-prohibitive for large-scale practice projects. Pine offers a "blank canvas" that, when properly sanded and sealed, can be stained to mimic much more expensive timbers. The official response to the popularity of this design suggests that the modern homeowner is moving away from mass-produced, disposable furniture in favor of pieces that carry the "imprint of the maker."
Implications: The Future of Home DIY
The success of this plant stand project has broader implications for the DIY market. We are seeing a distinct trend toward "Modular Home Improvement," where projects are designed with scalability in mind. Because the dimensions of this plant stand can be easily adjusted by altering the length of the legs or the width of the center support, the project serves as a foundational skill-set for larger furniture builds.
Furthermore, the environmental impact of choosing to build locally with sustainable pine, rather than importing mass-produced decor, is significant. The DIY movement is effectively reducing the carbon footprint associated with shipping lightweight but bulky furniture across the globe.
A Note on Maintenance and Longevity
While this project is designed for durability, the implications of using pine for outdoor furniture must be addressed. Pine is a softwood and is susceptible to moisture absorption. To ensure the longevity of the plant stand:
- Seal the End Grain: The ends of the 2x4s act like straws, drawing in moisture. Using a high-quality sealant on these areas is critical.
- Elevate the Base: If placing the stand on a damp patio, consider adding small rubber feet or plastic glides to the bottom of the legs to prevent the wood from wicking water from the ground.
- Routine Inspection: Seasonal temperature fluctuations can cause wood to expand and contract. Checking the pocket hole screws once a year for tightness is a standard maintenance practice for all furniture built with modern joinery.
Conclusion: Crafting Your Own Space
Building a DIY plant stand is more than a weekend distraction; it is an investment in your home environment. By following these steps, you are not only saving money but also gaining the confidence to tackle more complex interior design challenges. Whether you choose to stain it a deep, rich mahogany or paint it a stark, modern matte black, the result will be a piece of furniture that serves as a testament to your capability.
As you look at your finished stand, holding your favorite fern or succulent, you’ll realize that the true value isn’t just in the wood or the screws—it’s in the satisfaction of having created something lasting with your own hands. With the free plans provided and a bit of patience, you are ready to start your next chapter in home craftsmanship.
Remember: The best woodworkers aren’t the ones with the most expensive tools, but the ones who aren’t afraid to make a cut, learn from the process, and refine their craft with every single build. Happy building!


